I went on a vacation for a week with my brand new retina display I just paid a little over 3500 for. I ran into a snag not 2 days into the trip. The machine would no longer boot into OSX. After several google searches. All turned useless. I spent several hours searching one last time and came across a interesting article that suggested moving the fsck asside. So here are the results that I hope will save other techies days of searching.
Symptoms:
- Booting hangs at the apple logo
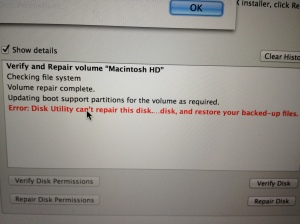
- Repairing the Disk fails (fsck -fy, restarts several times and does not succeed)
Error: Disk Utility can’t repair this disk…disk, and restore your backed-up files.
- Re-install is impossible (this is because the Macintosh HD is read only)

Configuration:
- OS X 10.8.x+ (650GB partition)
- refit http://refit.sourceforge.net/
- Windows 7 (100GB partition)
Problem:
I did not want to re-format. This was simply not an option. I just built the machine less than a week before the problem. It’s impossible thats its a hardware file. So I figure it may have been related to a recent update OS X 10.8.3 update. However, I can not be 100% that was the cause. All I know everything went for a turn for the worse
Solution:
So this is a multipart solution. Each one took me several hours to test. I should note here I am highly experienced with OSX/Linux machines. So non of this is out of my territory. I was sure I was not “hurting” my hardware/software.
WARNING: I WILL NOT BE RESPONSIBLE FOR LOST DATA FOR ANY REASON. USE THIS GUIDE AT YOUR OWN RISK OR FOR REFERENCE!!!
- Boot into single user mode, if you are using refit press F2 at the startup menu when you are on any the the “apple” icons, otherwise press Apple+S on startup.
- Now we need to stop fsck from running at startup because it keeps shutting down your machine when it fails to fix the errors.
To do this. I simply moved aside “fsck”.
WARNING: You must be very careful. Type exactly as you see it below!!!
-
mv /sbin/fsck /sbin/fsck.back
cp /usr/bin/true /sbin/fsck - (OPTIONAL STEP before rebooting)
- You may want to try just:
nvram boot-args=”-v”
-x means safe mode, -v will print out a tone of crap, remember safe mode does not load the graphics drivers so it will be much slower.
-
nvram boot-args=”-x -v”
be sure to disable the -x before you do the install step below
- Once you completed you “should” be able to reboot so long as a “real” hardware failure did not happen.
- You may want to try just:
-
- If you are able to boot into OS X you can continue to the next step, otherwise you probably have a hard drive / ssd failure at this point. For a brand new machine this is extremely unlikely. So you should “go no further” and bring your machine into Apple Support. If you able to run in single user mode. I would suggest backing up your data onto another drive before doing so. Most likely apple will wipe the drive when fixing your machine.
- Download 10.8 once you boot into OSX, you can do this by logging into the App Store (I have already purchased 10.8 for several other machines; however, I believe that if you say “buy” for 10.8 and you have 10.8 already installed you will not be changed, please someone post to confirm this to be true if you try this)
- (OPTIONAL STEP) If you took the optional step above, run this command in the Terminal.app (located in your /Applications/Utilities/ folder) before installing OS X:
sudo nvram boot-args=”-v”
- Now, you should be able to run the setup, once you do OS X will automatically reboot
- Once booted, DO NOT continue the install, simply goto disk utility from the menu
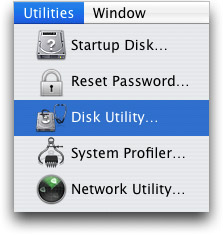
disk utility menu
DO NOT PRESS ERASE AT ANYTIME!!!
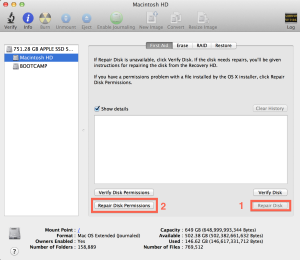
Repair disk after you boot into the “installer” for osx. Be sure to run step 1 and 2 in the image before closing.
- Once that is complete, exit disk utility
- Now run the installer… Note, I had to reboot a few times for the installer to detect the Machintosh HD again.
- If all is done correctly, you should just boot into OSX normally again
- Verify everything is working and your files still exist.
- Now, open a terminal and disable the boot args:
sudo nvram boot-args=””
This will turn off safe mode and the verbose flag. If you took the optional step to run in safe mode.
- NOTE: You should not need to reset fsck if you did that step above. This is because the re-install should overwrite the “fake” file you put in its place. However, do confirm fsck is still working.
- Open a terminal
fsck ?
fsck usage: fsck [-fdnypq] [-l number]
- Open a terminal


References:
